You may receive warnings from Meta in Events Manager regarding errors such as click ID, client_ip_address, fbp, fbc, etc. Don’t worry, as this could be caused by your previous pixel settings. The solution: make sure your pixel follows Meta’s Best Practices settings. First, you need to create a Dataset pixel. Here’s how:Documentation Index
Fetch the complete documentation index at: https://docs.scalev.com/llms.txt
Use this file to discover all available pages before exploring further.
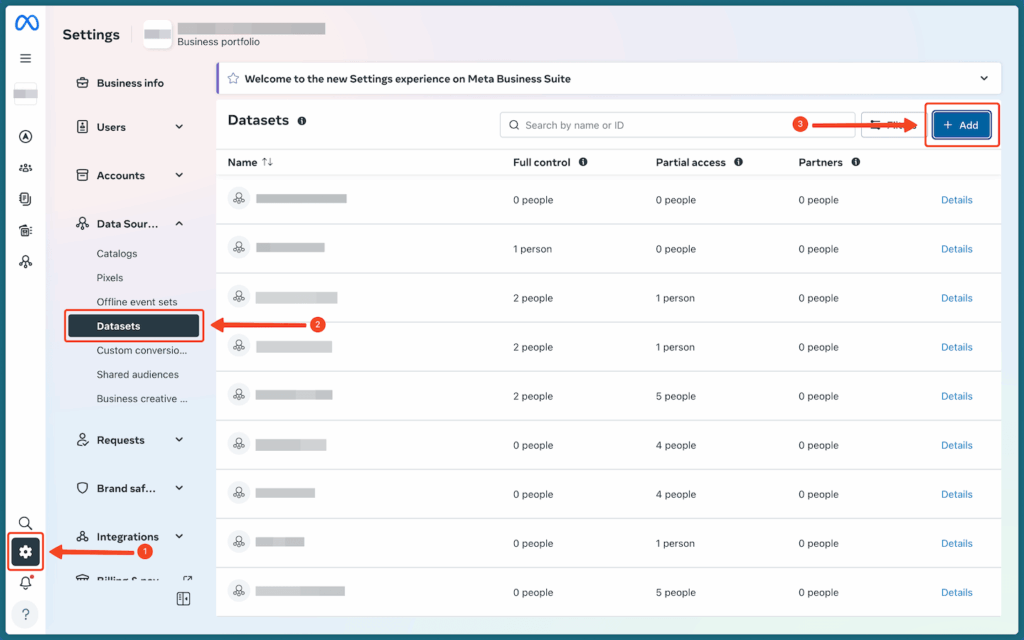
- Click Settings
- Click the Datasets menu
- Click the Add button
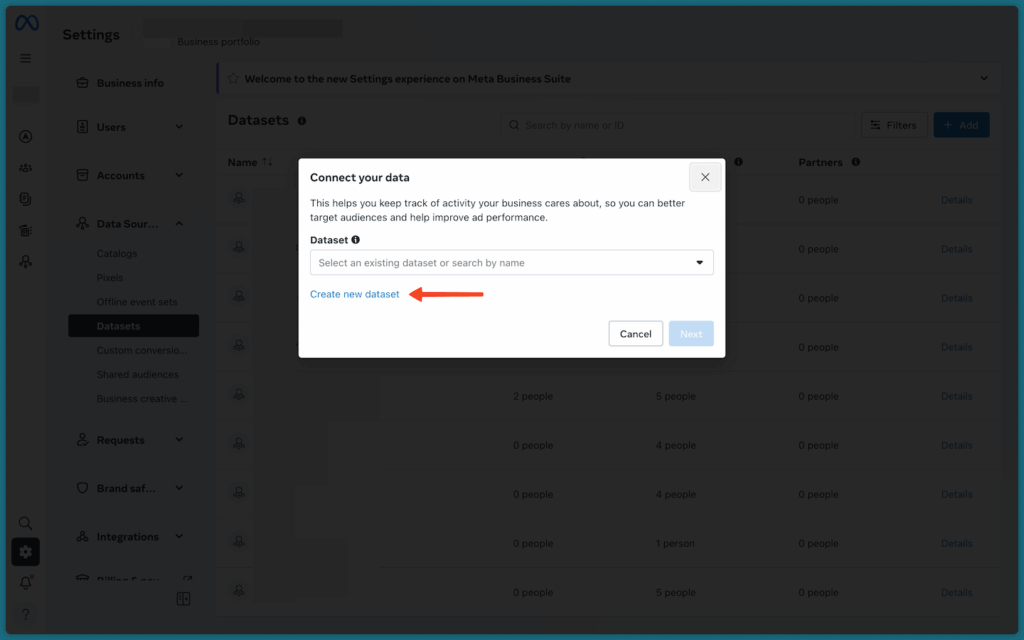
 Create a new dataset
It’s called a Dataset because now event data comes not only from the pixel, but from various sources, including: pixel, Conversion API, App, or Offline Conversion.
For online store players, you will generally need 3 event data sources (except App).
Continue.
Click Create new dataset
Create a new dataset
It’s called a Dataset because now event data comes not only from the pixel, but from various sources, including: pixel, Conversion API, App, or Offline Conversion.
For online store players, you will generally need 3 event data sources (except App).
Continue.
Click Create new dataset
 Create a new dataset
In the next popup:
Create a new dataset
In the next popup:
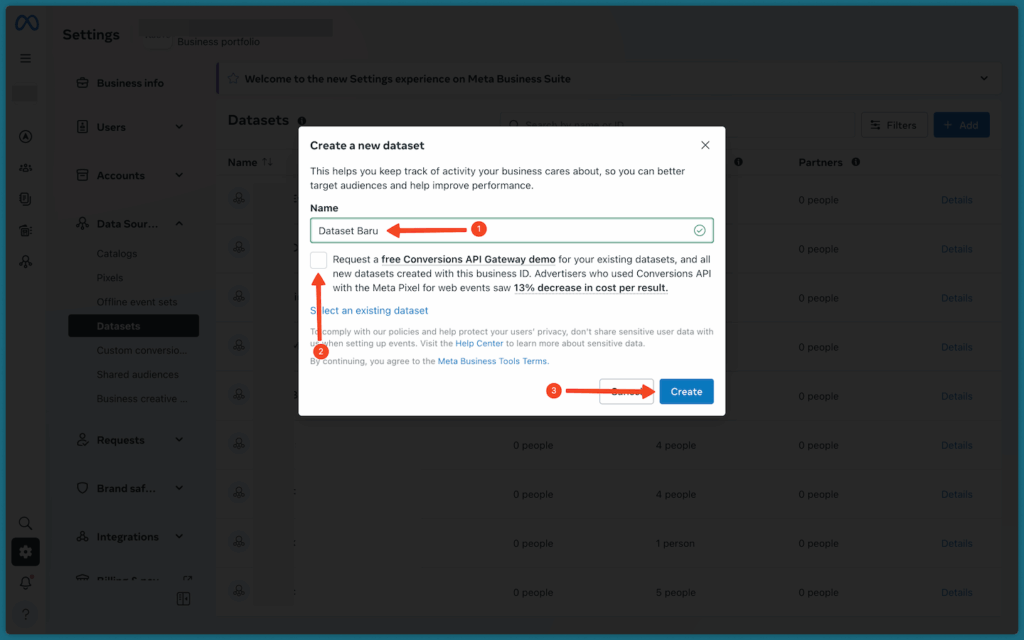 Complete the new dataset details
- Name - give a name for your new dataset
- Uncheck the box if the small checkbox field is checked
- Click the Create button
- Click your new dataset name
- Click the three-dot icon
- Click Open in Events Manager
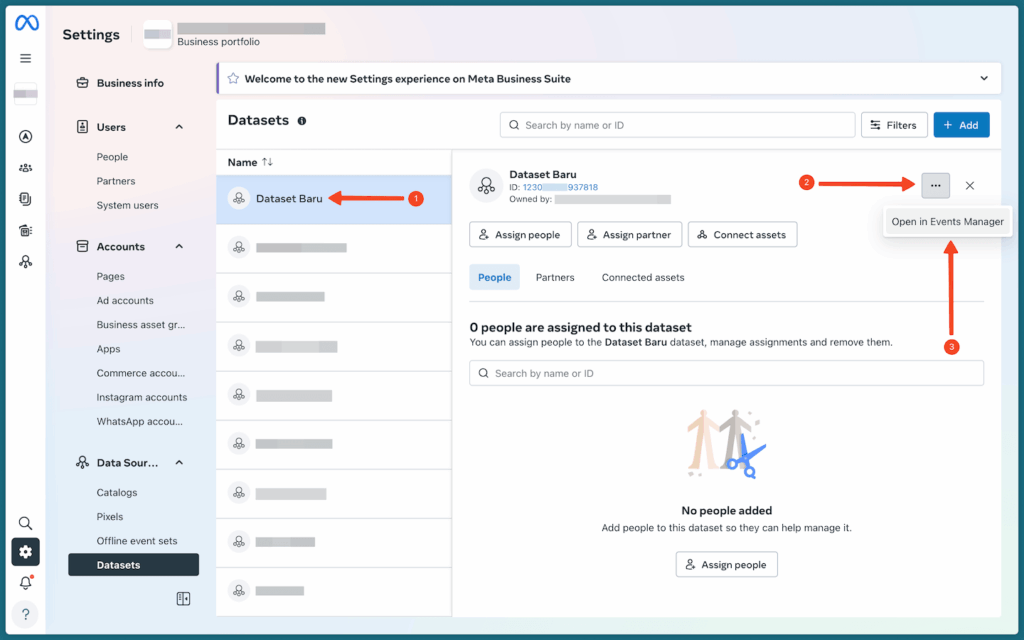 Open the Events Manager page in the new dataset
On the Events Manager page, click the Settings tab then scroll down to find the Conversions API section.
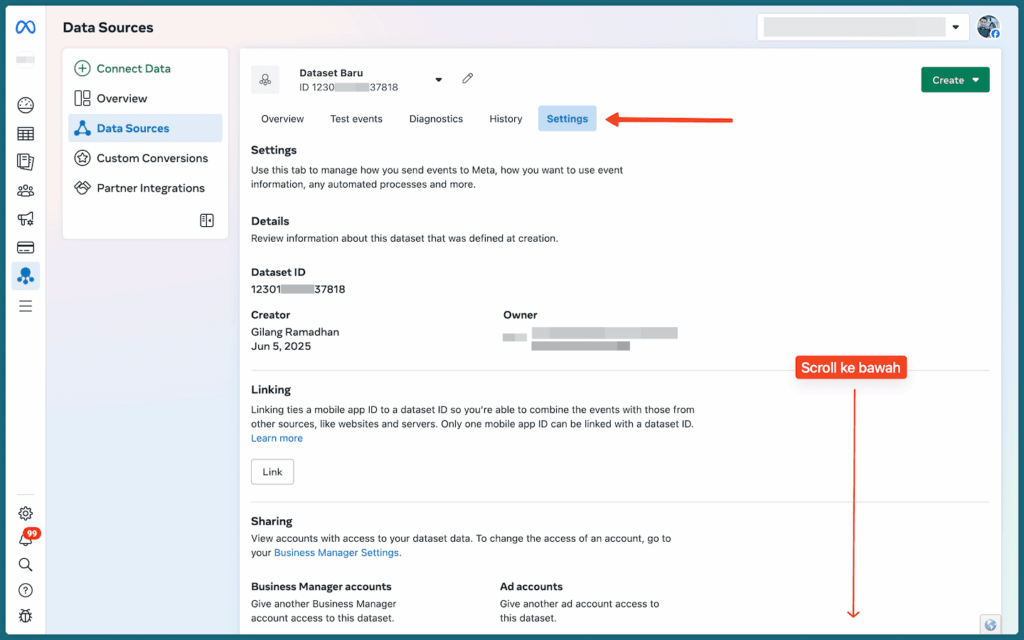
Open the Events Manager page in the new dataset
On the Events Manager page, click the Settings tab then scroll down to find the Conversions API section.
 Scroll down in the Settings tab
In the Conversions API > Setup direct integration > Set up with Dataset Quality API section > click the Generate access token link
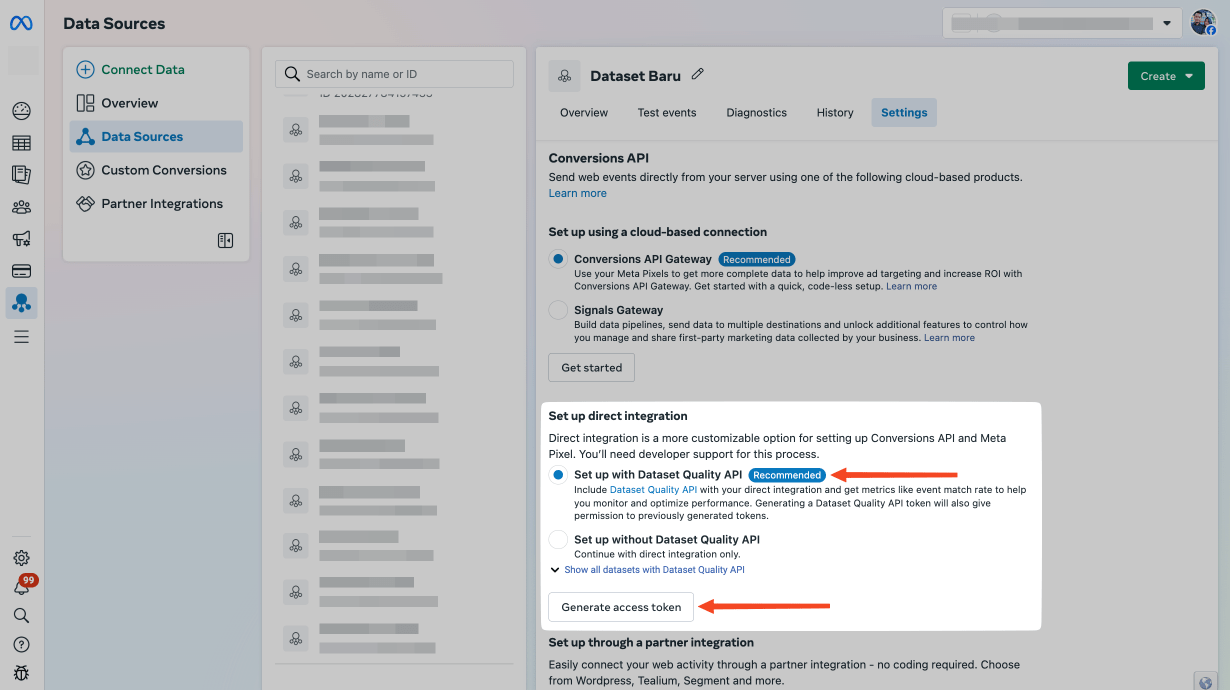
Scroll down in the Settings tab
In the Conversions API > Setup direct integration > Set up with Dataset Quality API section > click the Generate access token link
 Select Dataset Quality API
Dataset Quality API is the latest update from Meta that is said to function to improve ad performance compared to without it.
But based on user experience, the results are not always better.
So we recommend using the non-Quality API version.
NOTE: Once you activate Dataset Quality API on your dataset, you cannot revert it to the old version. Consider carefully before making a decision.
Select Dataset Quality API
Dataset Quality API is the latest update from Meta that is said to function to improve ad performance compared to without it.
But based on user experience, the results are not always better.
So we recommend using the non-Quality API version.
NOTE: Once you activate Dataset Quality API on your dataset, you cannot revert it to the old version. Consider carefully before making a decision.
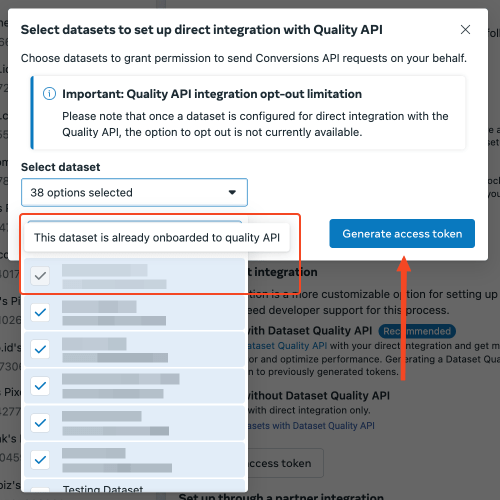 Select a dataset from the list
Make sure you select the dataset that you truly want to use the Dataset Quality API feature for.
Datasets with a grayed-out checkmark are already active with this feature.
Check the empty boxes for datasets you don’t want.
Select a dataset from the list
Make sure you select the dataset that you truly want to use the Dataset Quality API feature for.
Datasets with a grayed-out checkmark are already active with this feature.
Check the empty boxes for datasets you don’t want.
 CAPI access token code successfully generated
This is the token you need to copy and then enter into your pixel in the Analytics settings in Scalev.
CAPI access token code successfully generated
This is the token you need to copy and then enter into your pixel in the Analytics settings in Scalev.
 Enter the token code in the Conversion API Access Token field
Repeat the Generate access token process every 90 days to keep your dataset running smoothly.
NOTE:
Before a user can generate an access token, make sure first that the user’s role in your BM already has access to Apps and integrations.
Here’s how to verify:
1. Enter your Meta BM and click the gear icon at the bottom left
2. Then click the People menu, and a list of people in your BM will appear
3. Click the three dots to the right of the person’s name whose access rights you want to verify
Enter the token code in the Conversion API Access Token field
Repeat the Generate access token process every 90 days to keep your dataset running smoothly.
NOTE:
Before a user can generate an access token, make sure first that the user’s role in your BM already has access to Apps and integrations.
Here’s how to verify:
1. Enter your Meta BM and click the gear icon at the bottom left
2. Then click the People menu, and a list of people in your BM will appear
3. Click the three dots to the right of the person’s name whose access rights you want to verify
 Select the person whose access rights you want to check
4. A dialog like this screenshot will appear:
Select the person whose access rights you want to check
4. A dialog like this screenshot will appear:
 Grant Apps and Integration access rights to your selected person
5. Make sure the Manage toggle for “Apps and integrations” is turned on. If it’s not active, turn it on first.
6. Click the Save button
After that, you or members in your BM can generate an access token for the pixel that will be used for advertising.
Grant Apps and Integration access rights to your selected person
5. Make sure the Manage toggle for “Apps and integrations” is turned on. If it’s not active, turn it on first.
6. Click the Save button
After that, you or members in your BM can generate an access token for the pixel that will be used for advertising.
Enable the Automatic Website Matching feature
Next, make sure the Automatic Website Matching settings in your pixel’s Settings tab are all enabled. So that Meta can match the parameters sent through CAPI from your website. If the previous position was Off (disabled) like this: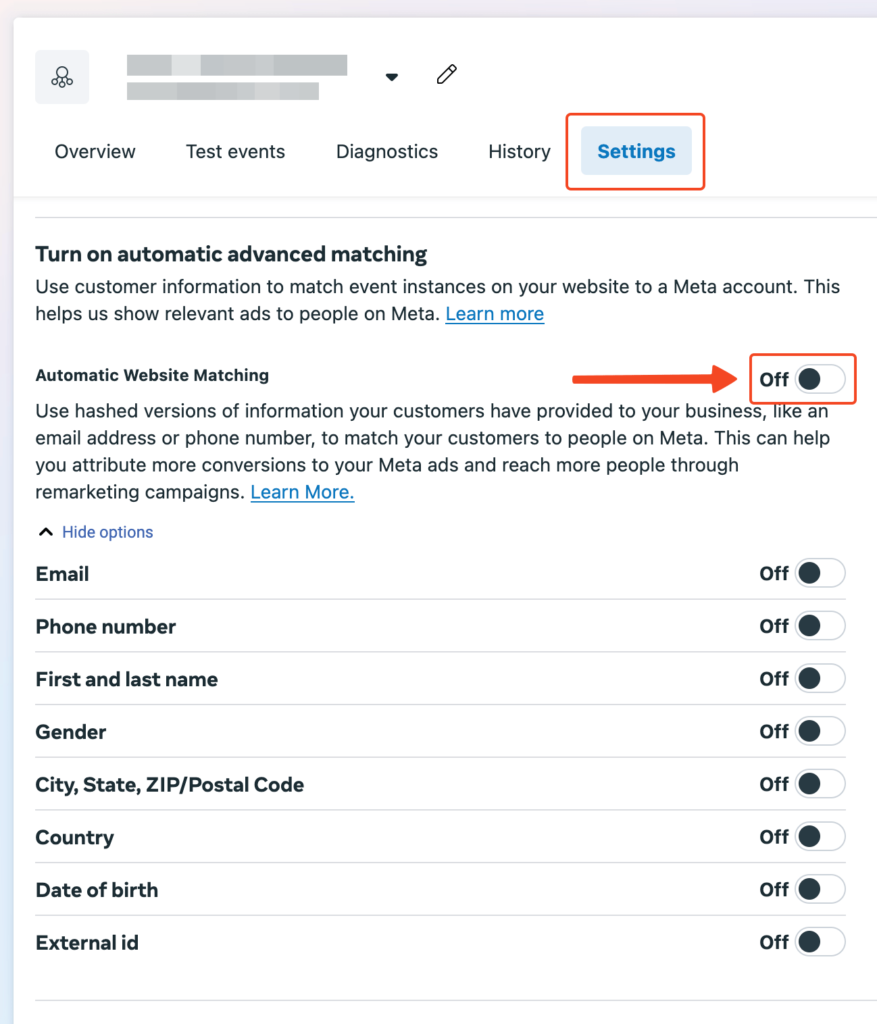 Turn on automatic advanced matching
Then click that Off toggle to enable it On (active).
Turn on automatic advanced matching
Then click that Off toggle to enable it On (active).
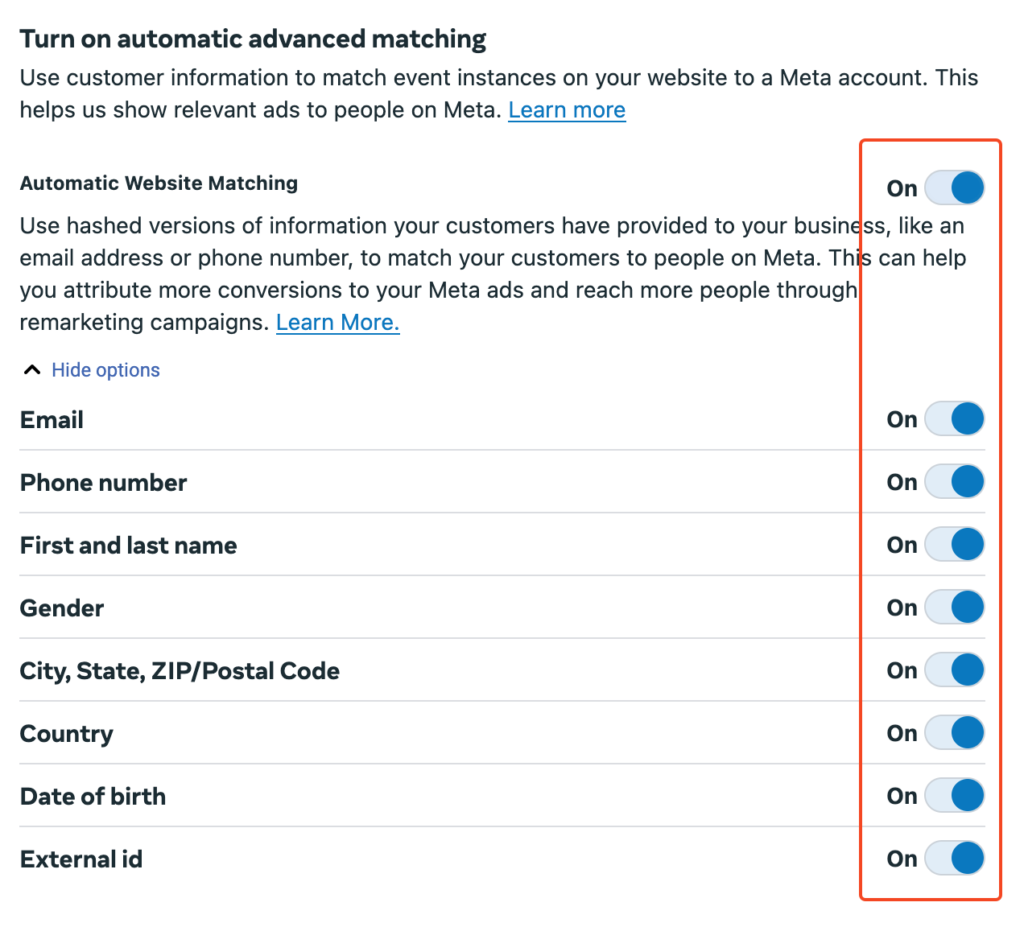 Automatic Website Matching feature is active
Disable automatic tracking feature
Still on the Settings tab page of your new dataset, scroll down and find the Events Setup > Track events automatically without code section. Make sure this feature is Off (disabled) to prevent random events that may not be needed for your business funnel.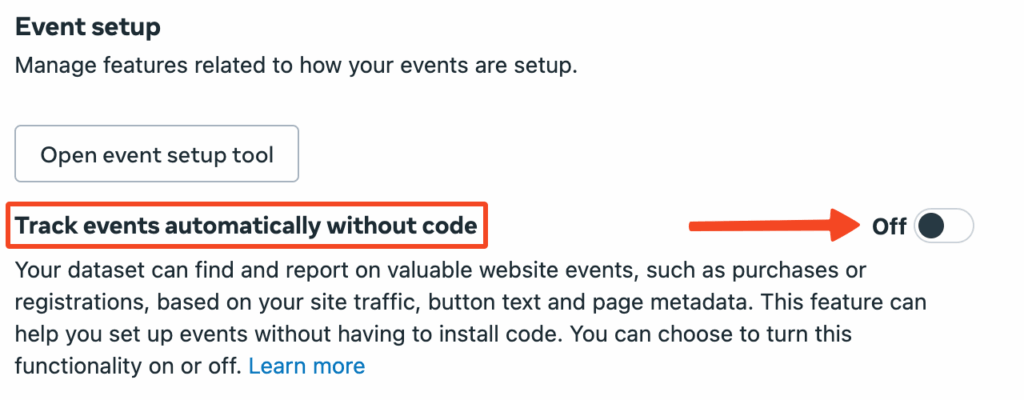 At this point, your Meta pixel and CAPI settings have been successfully optimized.
Don’t forget to check and make sure your pixel follows Meta’s Best Practices in this tutorial: Tutorial: How to Set Up Your Pixel According to Meta’s Best Practices
At this point, your Meta pixel and CAPI settings have been successfully optimized.
Don’t forget to check and make sure your pixel follows Meta’s Best Practices in this tutorial: Tutorial: How to Set Up Your Pixel According to Meta’s Best Practices